High Quality Material Presentation Boards

Often times as interior designers we are responsible for specifying finishes and materials that contribute to a well-designed and coordinated interior environment. We spend valuable time researching and selecting the appropriate products to recommend to the client and our presentation work should always be a reflection of that.

The way we represent our work needs to reflect confidence in our ability to listen to the client, meet budget and performance expectations and bring a high level of creativity and coordination to the project.

Example A_DD Level_Page_4

Example A_DD Level_Page_3

Example A_DD Level_Page_1

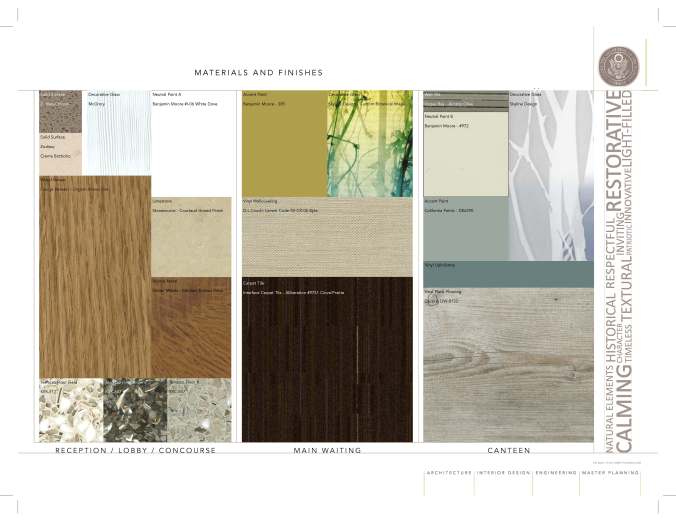
Here are some guidelines to follow that ensure a professional, organized and visually engaging materials board:

Basic Guidelines

  • Identify the specific location where the products will be used and arrange accordingly
  • Align materials to one another for an organized layout
  • Arrange materials with flooring at the bottom, then wall finish and finally casework and interior glazing at top
  • Size according to % used in an area
  • Include major material components (its okay to omit rubber base, etc)
  • Never show manufacturer labels or wording
  • Never include paint or plastic laminate samples with pre-punched holes

Enhanced Elements

  • Include key concept words to help visualize approach to the interior environment
  • Include 3D concept sketches to highlight overall design of space support material selections
  • Specific material information can be included, such as style name and #, color, manufacturer, etc. that coordinates with AI dwgs and specifications
  • Where applicable include specialty decorative lighting or other elements that enhance space

Example B_CD Level_Page_1

When it comes to presenting materials to the client I much prefer to start with a curated set of loose finishes and material samples, sometimes adding color and pattern options. This allows the clients to touch and interact with the materials and feel part of the selection process. Actual sample boards where the materials have been cut and mounted to foam core don’t last long and tend to get picked apart. They end up sitting around looking beat up and old, and eventually get thrown away.

It is only after approval based on the loose samples that I create the materials presentation board digitally in InDesign and Illustrator or Photoshop. I use the digital boards for final client sign-off and a visual record that can be referenced by both the client as well as the design and construction teams. The digital materials are much easier to size and manipulate in a manner that visually represents their impact in the spaces they will be used. The digital boards can be printed and mounted for presentations and stored on the computer for future reference.

Integrated Interior Design

I am a planner and an interior designer. I have shaped my professional career around my passion for both and feel very strongly that they are inherent skills to one another. I do not differentiated between the two when someone asks me what I do. Often times people refer to me as an architect because I’m doing planning. But that is not the case. I, along with many professional designers, have a wide range of talents in spatial design and 3 dimension problem solving.

Over the past 20+ years since I earned my degree, understanding and integration in architecture has grown tremendously but misconceptions and lost opportunities still persist. More often than not a designer is brought on near the end of a project to layer in the color and finishes or furniture layouts and not integrated in the whole design process. The designer misses the crucial opportunities to contribute to the fit-out team and document the design elements throughout the phases.

What does it mean for projects to have fully integrated interior design? How do you take a 2 dimensional plan and turn it into a beautifully designed and well-coordinated space that meets the clients expectations? Below is a chart illustrating key components a designer is responsible for | assisting on throughout all phases of the project with the main focus on interior design.

Integrated Interior Design_171020_v2_Page_1

Integrated Interior Design_171020_v3_Page_2

Family Waiting – why it’s needed

ed-waiting_mrmc

Family Waiting and Living Room at MRMC

Recently there has been quite a bit of discussion on the importance of waiting spaces in a healthcare setting. When faced with tight budgets, limited square footage, higher demands for clinical space, and not to mention equipment storage needs that keep growing, it is no wonder that any space given solely for families is being debated. Are they  really necessary components of the program?

Here’s a few things to consider:

1.   Patients’ family members are staying with them longer in the hospital than traditionally experienced. This is due in large part to clinical staff recognizing strong family support as essential members of the patient’s care provider team and the availability of better accommodations in the patient room.

2.    Longer stays means that families need to have access to a variety of amenities and different types of spaces – quiet zones vs. activity based areas. Many hospitals are providing family resource rooms, child playrooms, meditation rooms and touch-down spaces for laptop/work use. Lounges which provide kitchenettes where families can prepare and eat meals.  And finally, dedicated family lactation and laundry rooms are being provided in pediatric units.

3.    It is not always possible for the family to stay in the room with the patient the entire time during their hospital stay. The patient may require sleep with no interruptions, they may need their privacy in the room for certain procedures, or there may be times when the family member needs to get a break but still needs to be close by. Having a variety of family accommodations and settings will only reinforce their commitment and focus to the patient’s well-being.

Accessible Patient Toilets – to Plan Effectively is to Plan Early

20161110_final_clearance-diagrams_wheelchair-friendly
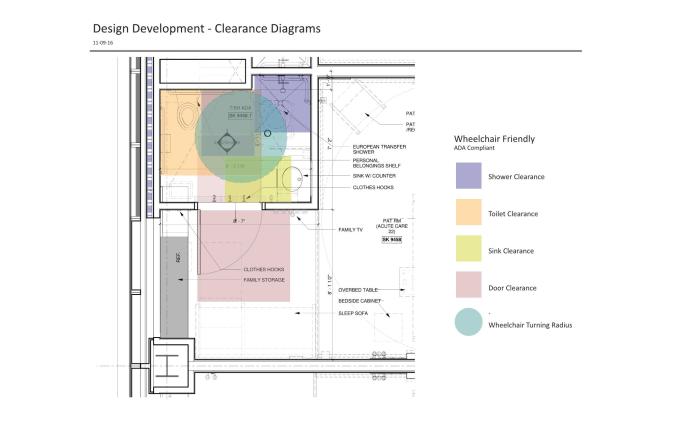
Fresh from planning new inpatient units through to design development my recent experience of designing code compliant patient toilets for 150 newly constructed rooms has given me insight on a few key planning considerations in the future will save me time and re-work (and possibly some sanity).

First and foremost, I cannot stress enough the importance of studying the applicable codes and understanding the impact they will have on the patient room design early in the planning process. Here are a few more:

  • Gain an early understanding of the projects goals and objectives around handicap accessibility needs. A few examples:

– Space program must include a minimum of 10% of all room types shall meet code but clients may ask for more.

– Identify construction constraints such as back-to-back toilets for shared chases, no fixtures to be placed on exterior walls; door size and type requirements

– Is the planning/design team considering creative space-saving ideas, such as sliding glass doors or an open “European” shower concept that allows for greater mobility in the toilet room?

  • Reach out to the accessibility code consultant early and often and give them the opportunity to weigh in on design options and considerations. Having a collaborative relationship provides the best outcomes
  • Plan in enough time for the design process. Don’t underestimate the hours it will take to review code requirements and their positive and negative impacts on the proposed design.
  • Research all the applicable accessibility codes for your project. They vary from state to state. Projects in Massachusetts need to meet both federal ADA Standards and MAAB (Massachusetts Architectural Access Board) 521 CMR.
  • Know that it is not possible to have only 1 type of handicap accessible patient toilet room on a Massachusetts project. 521 CMR states that of the 10% handicap accessible rooms, 5% need to meet “Transfer Type” shower, and 5% need to meet “Standard Roll-In Type” shower.
  • Identify specific requirements between applicable codes. There are different requirements between ADA Standards and 521 CMR and we have to design to the most stringent code. If a discrepancy doesn’t yield a more stringent requirement, then both codes need to be met.

– For example: ADA Standards requires the 36″x48” clear floor space for transfer type shower to be adjacent to the shower and aligned with the shower control wall (#608.2.1). However, MAAB 521 CMR requires the 36″x48” clear floor space to on center of the shower enclosure (#42.7.2 [b]). Because neither one is more stringent, a 6” offset is required at the control wall in order to maintain the 24” clearance from the enclosure’s center line, resulting in an overall clear floor space of 36”x54”.

  • EUROPEAN SHOWERS – Well-designed European showers (open shower concept with 2 walls instead of 3) are a great idea for gaining more space in a toilet room where space is a constraint and when showers are used infrequently but still required. If you are planning on European showers, please be aware that a variance may be required in order to achieve a code compliant intended design.


Designing with Decorative Glass

Below are images of a new inpatient beds and emergency department that incorporates interior glazing in multiple ways. Never compromising on function for the sake of aesthetic but in fact marrying the two to create a soothing, timeless, light-filled and sophisticated interior environment.

  • Glass at Patient Areas
    • Switchable Smart Glass
      • with the flick of a switch the vision glass in the ICU doors and observation stations changes from clear to translucent, allowing patients and staff to control privacy and eliminate need for blinds or cubicle curtains.
    • Frosted Glass
      • frosted glass slot window at the patient room toilet creates a light feature and allows natural light to filter through from the exterior windows in the toilet room and into the patient care area while obscuring detail.
  • Glass at Public Areas
    • Decorative Patterned Glass
      • used at in the family living room lounge areas to give a sense of screening but not block natural light.
    •  Fade Gradient Glass
      • used in the Emergency waiting room to obscure view to wheelchair storage and seating while allowing maximum lighting transmittance. More visibility is achieved as the gradient gets smaller extending up the glass panel for full view at eye level.

    Glass at Staff Areas

    • Decorative Patterned Glass
      • used at work station areas along the patient corridors, staff are able to see through the glass while giving a sense of a barrier without blocking view and natural light.

Planning to Code Minimum

key legend

Color Coded Key Legend of different spaces on inpatient unit

I have found that one of the biggest challenges in planning new inpatient units has been balancing the needs of patients, families and staff. They all are wanting and deserving of adequate space on the unit and inevitably there is never enough square footage to give everyone everything they need.

It is especially true for units that have been programmed with the code minimum requirements, which has become an increasingly popular practice mainly to control high construction costs.

I recently experienced this situation on a new inpatient unit project and was required to plan to a program developed with code minimum requirements. Throughout the planning process everyone was fighting for space and in the end they all had to compromise and no one was really satisfied with the end result.

I was constantly being challenged to create spaces that provided adequate size and quantity of staff offices, on-call rooms, and workrooms for training, teaching, consultation and rounding. (DPH guidelines require only 1 staff office on a unit). I’m not advocating for staff spaces to overrun the unit – of course everyone wants their own office – but there are critical functional requirements that are not addressed in the guidelines.

Never mind providing quiet family respite areas, child play areas, and dining for families on the unit. More often than not these functions are all crammed into the “Family Lounge” on the unit with bus-stop style seating and bare minimum amenities.

It is critical to the success of the project for the planner to look beyond code minimum and be allowed to address proper flow, function and design of these spaces.

It is an unrealistic goal for a planner to meet current clinical demands (never mind state-of-the art), implement best practices in healthcare design and truly create healing environments without looking beyond the required codes. To really be successful and gain high patient and staff satisfaction projects need to create programs that truly reflect the needs of staff, families and patients without being narrowly focusing on meeting code minimums.